
© Marijuana Seeds Canada | 2026


 We charge in Canadian dollars. Save 40%!
Planting cannabis seeds sounds simple: put seed in soil, add water, and wait. In real life, most failures happen in the first 10–14 days, when the seed is trying to sprout, and the seedling is still tiny. At this stage, the “rules” are different from an adult plant. Seeds need moisture and warmth, but they also need oxygen. Too much water is often worse than not enough.
This guide breaks the process down using basic plant biology, practical steps, and a few myth checks, so you can understand why each step matters.
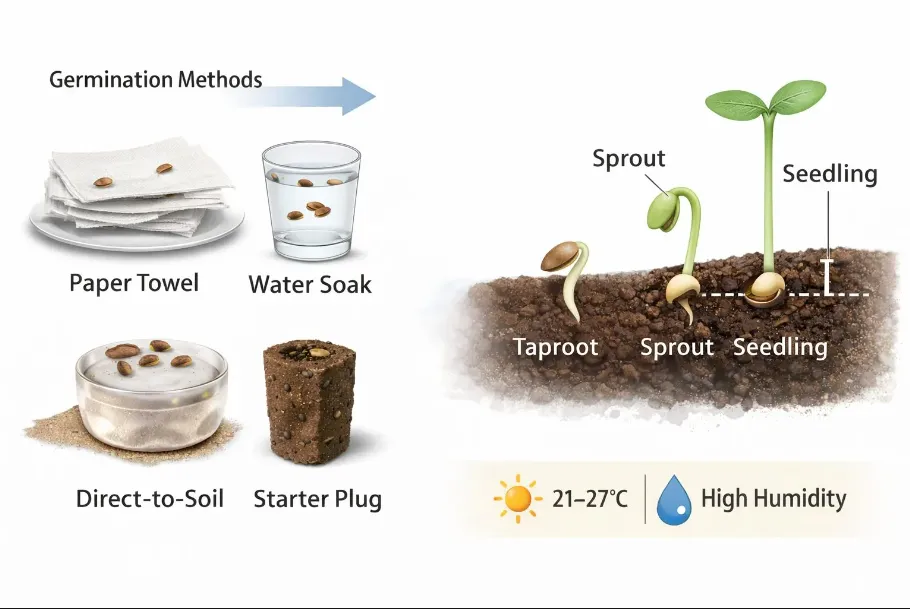
A cannabis seed is a living embryo wrapped in a protective shell. When it absorbs water, the embryo wakes up and sends out a taproot, the first white root. This is germination. After that, the taproot anchors into the growing medium and starts pulling in water and oxygen. Then the shoot pushes upward, and the first leaves appear.
So “planting” is really two connected steps:
Before you germinate, it helps to know what kind of seed you have. This doesn’t change the sprouting process much, but it affects planning.
Photoperiod plants stay in vegetative growth until they experience longer nights. Indoors, growers often use a specific light schedule to trigger flowering later.
Autoflowers shift to flowering based on age, not light. That can be helpful in short outdoor seasons, where day length changes quickly.
Feminized seeds are bred so most plants develop as female, which is important because female plants produce the flowers people usually mean when they talk about cannabis.
A seed’s appearance can’t guarantee success, but it can reveal obvious problems.
More promising seeds often look:
Seeds that often struggle:
This is the “why” behind every method. No matter how you germinate, these variables control success.
Seeds need water to activate enzymes and begin growth. But roots also need oxygen. If the seed sits in water too long or the environment is constantly saturated, oxygen levels drop, and rot becomes more likely.
Warmth speeds the chemical reactions inside the seed. A common target range is about 21°C to 27°C for consistent sprouting. Big temperature swings slow things down.
Germination isn’t just “water + heat.” The seed is living tissue doing respiration, which needs oxygen. This is why overly wet paper towels, soaked soil, and long water soaks can fail.
Early seedlings are vulnerable to pathogens, especially fungi that cause “damping-off.” Clean hands and clean containers reduce the odds of contamination.
Why it’s popular: You can see the taproot and time the transplant well.
Main risk: Handling can damage the taproot.
Why it’s used: Quick hydration, often within 24–48 hours.
Main risk: Oxygen runs out if seeds stay submerged too long.
Why it’s appealing: No transfer step, less taproot handling.
Main risk: People overwater because they can’t “see progress.”
Why they work well: They hold moisture and air in a balanced way and transplant easily.
Main downside: Cost.
These are all valid options. The best choice is usually the one you can keep stable and consistent.
Use clean paper towels, clean plates or a clean container, and water. Keep your work area clean because early-stage fungi don’t need much opportunity.
Dampen two paper towels, then squeeze them so they’re moist, not dripping. If water runs when you lift the towel, it’s too wet.
Put seeds between the towels with space between them. Cover with a plate or place inside a container to trap humidity.
Store in a warm, dark spot. Check once per day. The goal is stable moisture and warmth, not constant opening and closing.
When the taproot reaches roughly 1 cm, it’s usually ready to plant. Waiting too long can make the root longer and easier to bend or break.
Prepare your growing medium first. Make a hole about 1.25 cm (½ inch) deep.
Move the seed carefully (tweezers help). Place it taproot down. Cover lightly. Don’t pack the soil hard.
Why taproot-down matters: Roots show a natural “downward” growth response called gravitropism. If the root points down, the seedling usually establishes faster.
Direct-to-soil is simple, but it requires self-control.
Once the seedling breaks the surface, the job changes. Now it needs light, gentle watering, and time.
When the first rounded leaves (cotyledons) open, the seedling needs light. If the light is too weak or too far away, it may stretch tall and thin. Gentle lighting is usually better than harsh intensity early on.
Seedlings use very little water. Constantly wet soil reduces oxygen around the roots and raises the risk of fungal problems.
A practical approach:
Sometimes the seed shell sticks to the first leaves. Pulling it off can tear the seedling. In most cases, stable humidity and time solve it.
Planting cannabis seeds successfully isn’t about secret tricks. It’s about controlling a few key factors: moisture without drowning, warmth without overheating, oxygen for the developing root, and a clean setup to reduce early fungal problems. Choose a germination method you can keep consistent, plant at a sensible depth, and treat seedlings gently during their first weeks. When you understand the biology, the steps stop feeling like guesswork and start feeling predictable.
Many seeds sprout within 1–4 days in stable conditions, but it can take longer depending on temperature, moisture, and seed maturity.
A common target range is about 21°C to 27°C. Consistency matters more than pushing the highest number.
Paper towel makes it easier to see progress and time transplanting. Direct-to-soil reduces handling but requires patience and careful watering.
A typical depth is about 1.25 cm (½ inch). Too deep can slow emergence, too shallow can dry the seed.
One common cause is damping-off, a fungal issue linked to overly wet conditions and poor airflow. Prevent it with clean tools, gentle watering, and avoiding constantly saturated soil.
That’s usually stretching from weak light or the light being too far away. Adjusting light strength or distance (without overheating) often helps.
A common timing cue is when the taproot is about 1 cm long. At that point, it’s developed but still short enough to move with less risk of bending or breaking.
Outdoor growing looks simple: plant in spring and harvest in ...
People often treat planting depth like a “small detail.” In ...
Buying cannabis seeds in 2026 feels more confusing than it ...
Shopping with us is 100% secure! We don’t keep personal details.

Important Links
Are You 18 Or Over?
By clicking 'Continue', you confirm that you are over 18 years old. By using this website, you agree to our terms of service.