
If you are a hobbyist or a small-time weed distributor that aims to produce 1 to 5 ounces per month, a grow tent is suited for you since it is not designed for large-scale operations. This is the best and economical way if you want to start up an empire!
The average grow tent only costs a surprisingly low amount of $70 to $150; this may vary depending on the size of the tent. You can opt to add certain features similar to the grow tents in the market; you just have to have patience in sourcing the materials and the creativity to assemble the tent itself.
Having to assemble your own grow tent is easy as pie. You just have to build it like every other camping tent is built; it can practically be assembled by anyone. You just have to make sure it’s sturdy to protect your precious plants.
One advantage of a grow tent is keeping everything private and discreet; every grow tent prevents the strong smell that the plants emit and also prevents the exposure of the grow lights. The tent itself can be hidden from prying eyes and can be practically tucked away inside your spare room or big closet space.
If you want a constant amount of yield, you may set up two growing tents, one for vegetation and another for flowering; in this way, you have a cycle wherein you may manage the expected yield.
The majority of the grow tents have filtered intake valves that allow air to freely enter but restrict bugs and pests from entering the chamber; this will reduce or eliminate any plant damage caused by unwanted visitors.
One advantage of placing filters or mesh to your air intake devices is keeping any dust or impurities from contaminating the buds. The sticky membrane on the buds is an avenue for dust or any fiber to cling onto. These specks of dust and fiber may not affect the test of the joint, but who would want a dusty bud, right?
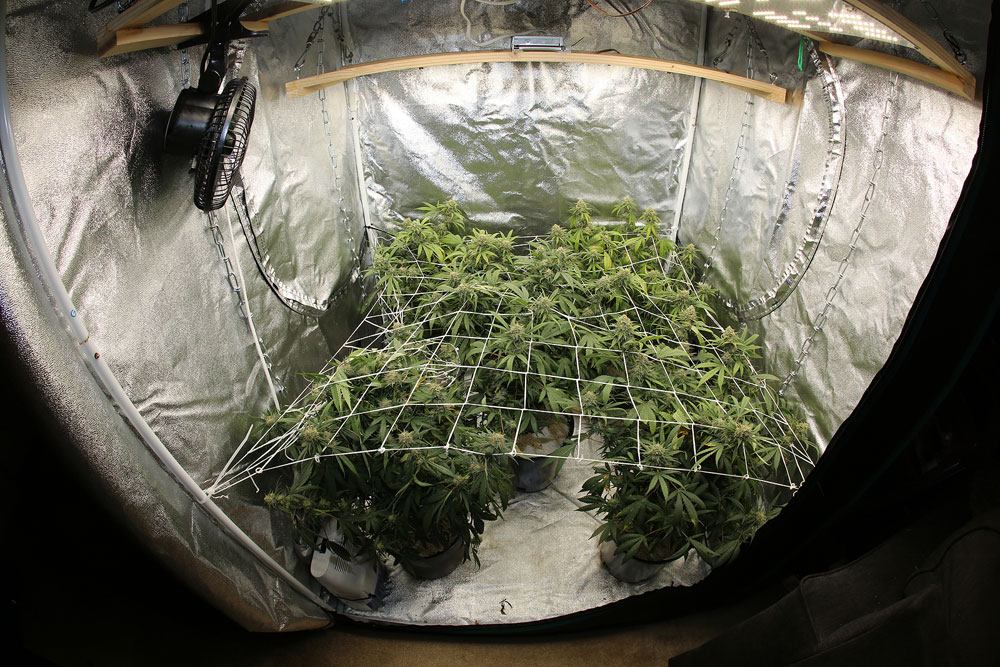
When a grow tent is properly utilized, it lets you mimic the natural conditions in which the cannabis plant thrives. The hardest thing to do to help the plant to stay alive is to perfect the environment that suits the needs of the plant. However, once the environment is set up, it is already easy to create consistent planting and harvesting.
If you do not have experience in setting up the proper environment for your plants, then these are the DIY tips that you can take note of:
If you have an old shoe rack lying around, then you can freely use it for your grow tent.
The materials that you will be using are:
Since the shoe rack is already formed with a back enclosure and shelves, you just need to modify it by creating intake holes where you will mount your intake fans; the same goes for the top part; an intake valve or hole must be set in place for your exhaust fan. After the holes are made, the next thing you can do is insulate all the inner parts of the whole shoe rack with poly film to act as an insulator to supply all the needed light by the plant.
Afterward, the next thing to do is make a door for your build using the plywood; after that’s been done, you may now mount all the fans, lighting, and cables using the mounting tape to finalize the build. The old pans are used as a basin for the excess water that can be easily disposed of and to prevent any mess.
A PVC pipe frame can be a money-saving technique to create a sturdy grow tent. Also, it can be easily assembled and easily modified to obtain a certain size that is based on your preference.
What you’ll need:
Start by measuring and cutting all the PVC pipes, then attach every pipe to create a rectangular frame where all the insulating foam and poly film should be attached to create a wall that covers the entire build. Using the PVC pipes, create support for the plywood by making beams that will carry the plywood and plants’ weight.
From then on, you have to strategically place your intake and exhaust fans to create proper ventilation all over the grow tent. The lights must be properly mounted to the pipes using cable ties and electrical tape; you can use your glue gun to seal off any gaps and place the old pans at the bottom as an excess water catcher.
Never throw away a good old closet; this is one of the best materials that you can use to make a fool-proof DIY grow tent. All you need is a few materials, and it will be the stealthiest and sturdiest tent that you can ever have. Plus, it can be regularly modified for further improvements and upgrades.
What you’ll need are the following:
The first thing that you need to do is remove all the existing divisions or shelving in the closet; once done, measure the height and distance of the new division or shelving that will fit your cannabis plant. Then, drill pilot holes to carve out the slots for your intake and exhaust fans. Then, attach the L-type brackets to the closet wall using screws to function as the support for the new shelving.
After attaching the L-type brackets, cover the entire wall surface of the closet with poly film with the use of mounting tape. Afterward, mount all your lighting setup as well as the intake and exhaust fans. The cable manages every wire using the cable ties. Place all the shelving, test all the wiring, and cover your fans with a carbon filter, then you are good to go!
The same principle applied to the shoe rack build; the only difference is that the storage rack is more modular and sturdy than the shoe rack. If you have only a storage rack that can be disassembled, then you are good to go. If not, you can usually find these in garage sales or ask your granny, for sure she has one in the shed.
The things that you need are:
In this build, you will save a lot of money because you won’t have to purchase poly films to cover up the whole surface. What you need to do is create a line above you build using the clothes wire where you will hang your grow lights. Make sure that cables are managed using cable ties; in this phase, you will also tie down the intake and exhaust fans to the corners of the storage rack.
Once all the components are mounted, carefully place the plywood to serve as your shelves. Then, wrap up the left, right, and back parts of the storage rack with tin foil and carve out the holes for the fans. Create a curtain of tinfoil for the front part of the storage rack to serve as an enclosure for the grow tent.
One of the purposes, why grow tents are created, is to make everything discreet and away from the prying eyes of the public. Also, a grow tent restricts any ray of light to seep through the tent. A cannabis plant needs pitch black darkness at night for the plant to produce as many buds as it can. Also, you do not want every neighbor to be alerted by any super bright light in your home. A great idea is by using molding clay and also silicon pastes to seal the gaps of your build.
Your DIY grow tent must have waterproof materials as well as a water pan to catch all the water that accidentally spills. This prevents any water from reaching your floorboards, causing any water damage. Also, by having waterproof walls, dirt cannot stick easily. Plus, you are given the convenience to easily wipe the walls to maintain cleanliness. You can easily waterproof your tent by using hydrophobic materials such as paint and other compounds.
Since this is a DIY tent, you have the liberty and freedom to strategically place the exhaust fans and intake fans to make airflow effective. Also, this will give you a lot of options on how many fans to be used as well as how big or small the fans can be. By placing them in a strategic location, you can create a whirlwind of air that can circulate across every part of the tent, giving the plant more room to breathe. This will also solve the overheating problems caused by the growing lights.
It is tricky to make a DIY tent smell-proof, but even though it’s hard, you still have to do it. Besides attracting too much attention, who would want their house and all of their stuff smelling weed. The trick is attaching a carbon filter into the exhaust fans and making sure no air escapes through the tent doors.
You can use your old incandescent bulbs or CFLs for your DIY grow lights, to control their heat, create a film that will redirect the direct light to the insulated wall. You can create rows of grow lights by mounting them using zip ties and electrical tape to a rod or a piece of wood. To save energy and to save from purchasing a lot of lighting units, be creative and add reflective walls such as aluminum foil or chrome insulation that can let light freely bounce off to every surface and will ensure the plant is getting enough light. Also, you can purchase your timer switch that can automate the lights.
Essentially, an old rack, tent, or even an old cabinet can be turned into a DIY grow tent; you just have to use your imagination as well as your creativity to repurpose these materials instead of throwing them away. The same principles apply, create proper lighting, proper ventilation and insulation, and also proper spacing to avoid overcrowding. These are your creative ideas for your DIY grow tent that you can use to start growing your merch.
Important Links
Subscribe and Get 10% Off
Connect With Us